1
2
3
4
5
6
7
8
9
10
11
12
13
14
15
16
17
18
19
20
21
22
23
24
25
26
27
28
29
30
31
32
33
34
35
36
37
38
39
40
41
42
43
44
45
46
47
48
49
50
51
52
53
54
55
56
57
58
59
60
61
62
63
64
65
66
67
68
69
70
71
72
73
74
75
76
77
78
79
80
81
82
83
84
85
86
87
88
89
90
91
92
93
94
95
96
97
98
99
100
101
102
103
104
105
106
107
108
109
110
111
112
113
114
115
116
117
118
119
120
121
122
123
124
125
126
127
128
129
130
131
132
133
134
135
136
137
138
139
140
141
142
143
144
145
146
147
148
149
150
151
152
153
154
155
156
157
158
159
160
161
162
163
164
165
166
167
168
169
170
171
172
173
174
175
176
177
178
179
180
181
182
183
184
185
186
187
188
189
190
191
192
193
194
195
196
197
198
199
200
201
202
203
204
205
206
207
208
209
210
211
212
213
214
215
216
217
218
219
220
221
222
223
224
225
226
227
228
229
230
231
232
233
234
235
236
237
238
239
240
241
242
243
244
245
246
247
248
249
250
251
252
253
254
255
256
257
258
259
260
261
262
263
264
265
266
267
268
269
270
271
272
273
274
275
276
277
278
279
280
281
282
283
284
285
286
287
288
289
290
291
292
293
294
295
296
297
298
299
300
301
302
303
304
305
306
307
308
309
310
311
312
313
314
315
316
317
318
319
320
321
322
323
324
325
326
327
328
329
330
331
332
333
334
335
336
337
338
339
340
341
342
343
344
345
346
347
348
349
350
351
352
353
354
355
356
357
358
359
360
361
362
363
364
365
366
367
368
369
370
371
372
373
374
375
376
377
378
379
380
381
382
383
384
385
386
387
388
389
390
391
392
393
394
395
396
397
398
399
400
401
402
403
404
405
406
407
408
409
410
411
412
413
414
415
416
417
418
419
420
421
422
423
424
425
426
427
428
429
430
431
432
433
434
435
436
437
438
439
440
441
442
443
444
445
446
447
448
449
450
451
452
453
454
455
456
457
458
459
460
461
462
463
464
465
466
467
468
469
470
471
472
473
474
475
476
477
478
|
---
title: My Magical Adventure With cloud-init
date: 2021-06-04
---
> "If I had a world of my own, everything would be nonsense. Nothing would be
> what it is, because everything would be what it isn't. And contrary wise, what
> is, it wouldn't be. And what it wouldn't be, it would. You see?"
- The Mad Hatter, Alice's Adventures in Wonderland
The modern cloud is a magical experience. You take a template, give it some SSH
keys and maybe some user-data and then you have a server running somewhere. This
is all powered by a tool called [cloud-init](https://cloud-init.io/). cloud-init
is the most useful in actual datacenters with proper metadata services, but what
if you aren't in a datacenter with a metadata service?
Recently I wanted to test a
[script](https://github.com/tailscale/tailscale/blob/main/scripts/installer.sh)
a coworker wrote that allows users to automatically install Tailscale on every
distro and version Tailscale supports. I wanted to try and avoid having to
install each version of every distribution manually, so I started looking for
options.
[This may seem like overkill (and at some level it probably is), however as a
side effect of going through this song and dance you can spin up a bunch of VMs
pretty easily. <br /> <center> <blockquote class="twitter-tweet"><p lang="und"
dir="ltr"><a
href="https://t.co/yays27Wmes">pic.twitter.com/yays27Wmes</a></p>— Xe from
Within (@theprincessxena) <a
href="https://twitter.com/theprincessxena/status/1394265890494062593?ref_src=twsrc%5Etfw">May
17, 2021</a></blockquote> <script async
src="https://platform.twitter.com/widgets.js"
charset="utf-8"></script> <center>](conversation://Mara/hacker)
cloud-init has a feature called the
[NoCloud](https://cloudinit.readthedocs.io/en/latest/topics/datasources/nocloud.html)
data source. To use it, you need to write two yaml files, put them into a
specially named ISO file and then mount it to the virtual machine. cloud-init
will then pick up your configuration data and apply it.
[Wait...really? What.](conversation://Mara/hmm)
[Yes, really.](conversation://Cadey/coffee)
Let's make an [Amazon Linux
2](https://docs.aws.amazon.com/AWSEC2/latest/UserGuide/amazon-linux-2-virtual-machine.html)
virtual machine as an example. Amazon offers their Linux distribution for
download so you can run it on-premises (I don't really know why you'd want to do
this outside of testing stuff on Amazon Linux). In this blog we use KVM, so keep
that in mind when you set things up yourself.
First you need to make a `meta-data` file, this will contain the VM's hostname
and the "instance ID" (this makes sense in cloud contexts however you can use
whatever you want):
```yaml
local-hostname: mayhem
instance-id: 31337
```
[You can configure networking settings here, but our VM is going to get an
address over DHCP so you don't really need to care about that in this case](conversation://Mara/hacker)
Next you need to make a `user-data` file, this will actually configure your VM:
```yaml
#cloud-config
#vim:syntax=yaml
cloud_config_modules:
- runcmd
cloud_final_modules:
- [users-groups, always]
- [scripts-user, once-per-instance]
users:
- name: xe
groups: [ wheel ]
sudo: [ "ALL=(ALL) NOPASSWD:ALL" ]
shell: /bin/bash
ssh-authorized-keys:
- ssh-ed25519 AAAAC3NzaC1lZDI1NTE5AAAAIPYr9hiLtDHgd6lZDgQMkJzvYeAXmePOrgFaWHAjJvNU cadey@ontos
write_files:
- path: /etc/cloud/cloud.cfg.d/80_disable_network_after_firstboot.cfg
content: |
# Disable network configuration after first boot
network:
config: disabled
```
Please make sure to change the username and swap out the SSH key as needed,
unless you want to get locked out of your VM. For more information about what
you can do from cloud-init, see the list of modules
[here](http://cloudinit.readthedocs.io/en/latest/topics/modules.html).
Now that you have the two yaml files you can make the seed image with this
command (Linux):
```console
$ genisoimage -output seed.iso \
-volid cidata \
-joliet \
-rock \
user-data meta-data
```
[In NixOS you may need to run it inside nix-shell: `nix-shell -p
cdrkit`.](conversation://Mara/hacker)
Or this command (macOS):
```console
$ hdiutil makehybrid \
-o seed.iso \
-hfs \
-joliet \
-iso \
-default-volume-name cidata \
user-data meta-data
```
Now you can download the KVM image from that [Amazon Linux User Guide page from
earlier](https://docs.aws.amazon.com/AWSEC2/latest/UserGuide/amazon-linux-2-virtual-machine.html)
and then put it somewhere safe. This image will be written into a [ZFS
zvol](https://pthree.org/2012/12/21/zfs-administration-part-xiv-zvols/). To find
out how big the zvol needs to be, you can use `qemu-img info`:
```console
$ qemu-img info amzn2-kvm-2.0.20210427.0-x86_64.xfs.gpt.qcow2
image: amzn2-kvm-2.0.20210427.0-x86_64.xfs.gpt.qcow2
file format: qcow2
virtual size: 25 GiB (26843545600 bytes)
disk size: 410 MiB
cluster_size: 65536
Format specific information:
compat: 1.1
compression type: zlib
lazy refcounts: false
refcount bits: 16
corrupt: false
extended l2: false
```
The virtual disk image is 25 gigabytes, so you can create it with a command like
this:
```console
$ sudo zfs create -V 25G rpool/safe/vms/mayhem
```
Then you use `qemu-img convert` to copy the image into the zvol:
```console
$ sudo qemu-img convert \
-O raw \
amzn2-kvm-2.0.20210427.0-x86_64.xfs.gpt.qcow2 \
/dev/zvol/rpool/safe/vms/mayhem
```
If you don't use ZFS you can make a layered disk using `qemu-img create`:
```console
$ qemu-img create \
-f qcow2 \
-o backing_file=amzn2-kvm-2.0.20210427.0-x86_64.xfs.gpt.qcow2 \
mayhem.qcow2
```
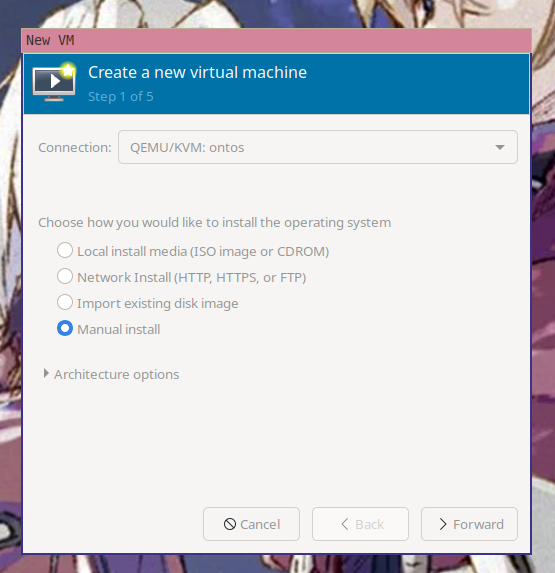
Open up virt-manager and then create a new virtual machine. Make sure you select
"Manual install".
<center>
</center>
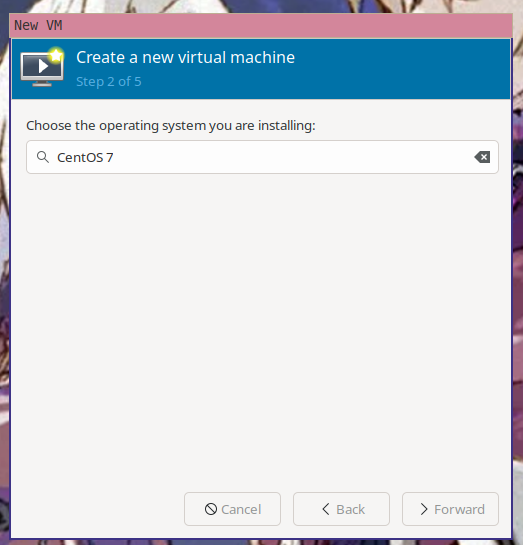
virt-manager will then ask you what OS the virtual machine is running so it can
load some known working defaults. It doesn't have an option for Amazon Linux,
but it's kinda sorta like CentOS 7, so enter CentOS 7 here.
<center>
</center>
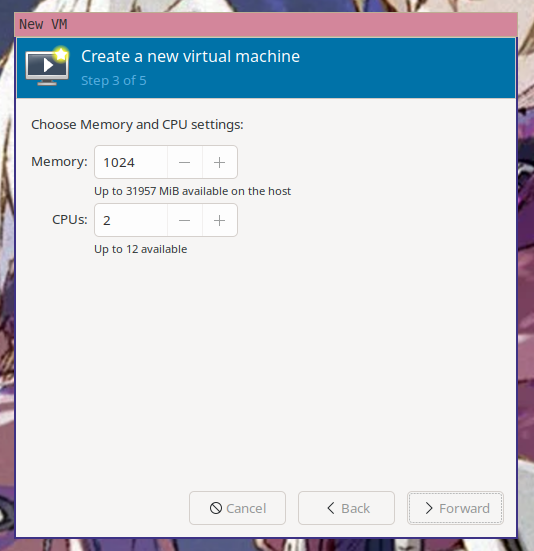
The default amount of ram and CPU are fine, but you can choose other options if
you have more restrictive hardware requirements.
<center>
</center>
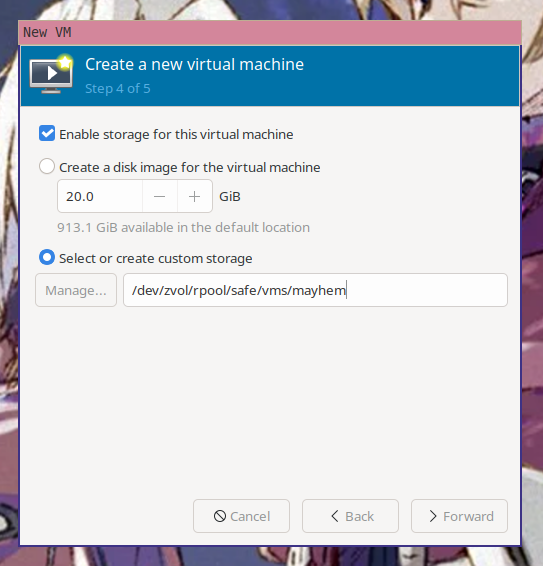
Now you need to select the storage path for the VM. virt-manager will helpfully
offer to create a new virtual disk for you. You already made the disk with the
above steps, so enter in `/dev/zvol/rpool/safe/vms/mayhem` (or the path to your
custom layered qcow2 from the above `qemu-img create` command) as the disk
location.
<center>
</center>
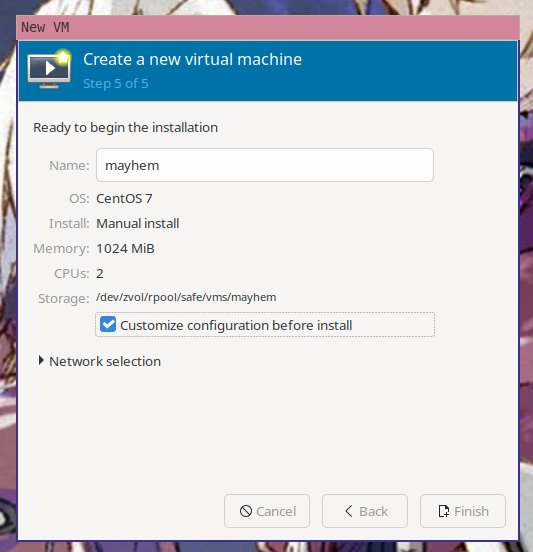
Finally, name the VM and then choose "Customize configuration before install" so
you can mount the seed data.
<center>
</center>
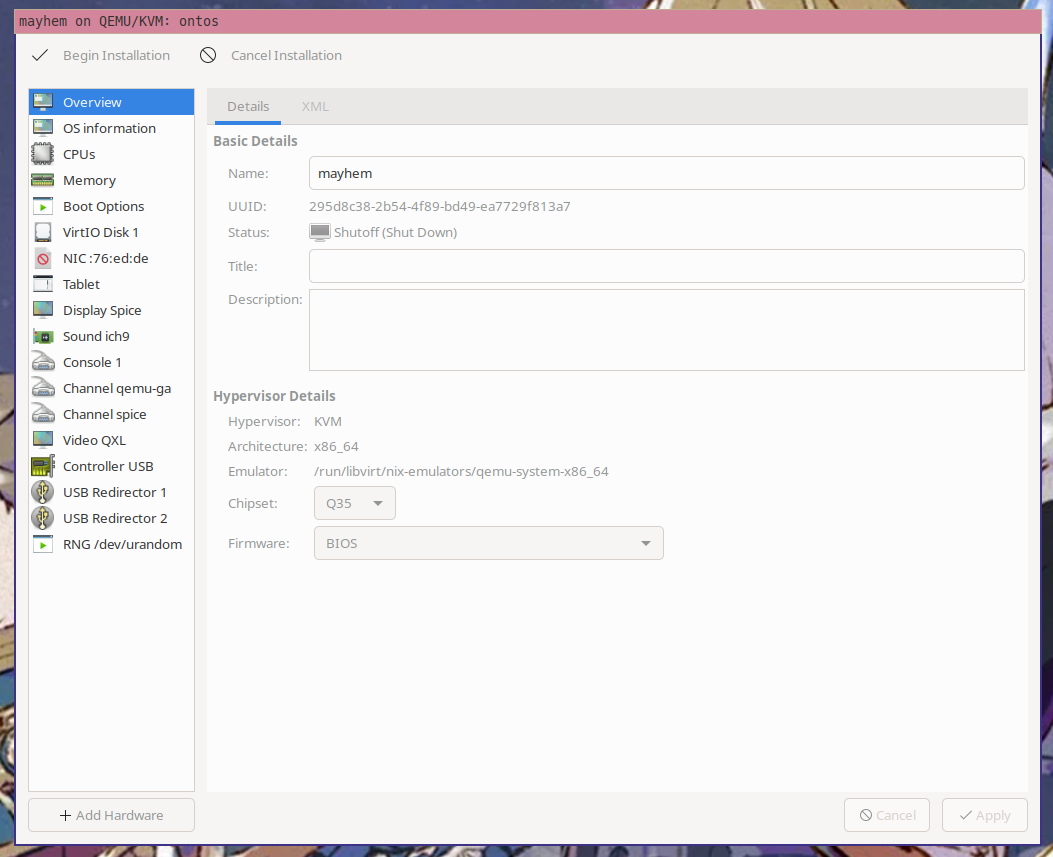
Click on the "Add Hardware" button in the lower left corner of the configuration
window.
<center>
</center>
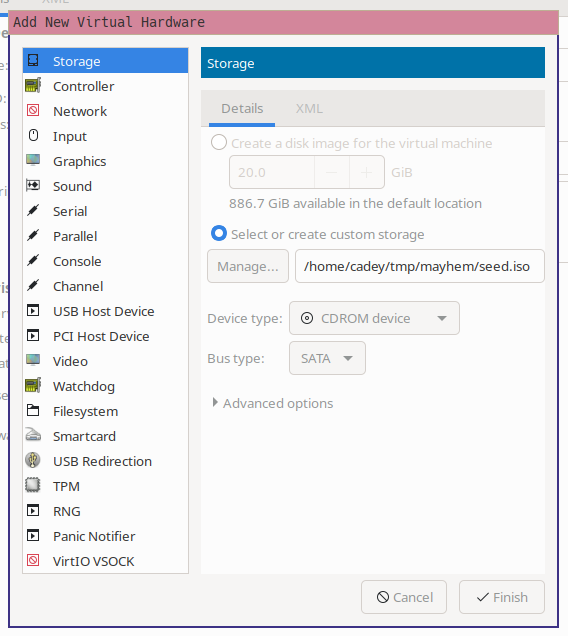
Make a new CDROM storage device that points to your seed image:
<center>
</center>
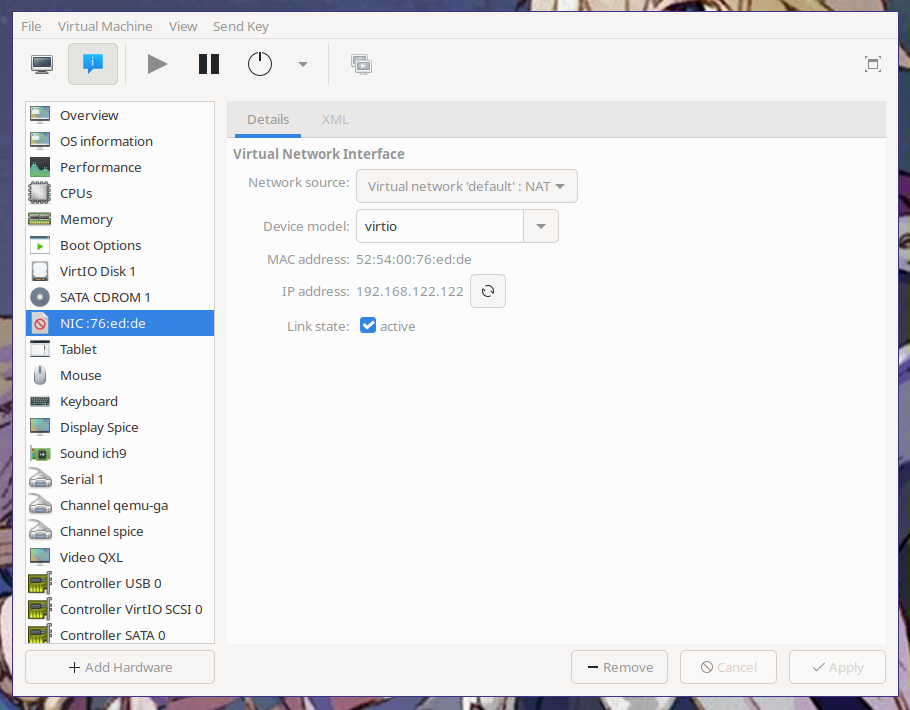
And then click "Begin Installation". The virtual machine will be created and its
graphical console will open. Click on the info tab and then the NIC device. The
VM's IP address will be listed:
<center>
</center>
Now SSH into the VM:
```console
$ ssh xe@192.168.122.122
The authenticity of host '192.168.122.122 (192.168.122.122)' can't be established.
ED25519 key fingerprint is SHA256:TP7dWLkHOixx5tr78qn0yvDQKttH0yWz6IBvbadEqcs.
This key is not known by any other names
Are you sure you want to continue connecting (yes/no/[fingerprint])? yes
Warning: Permanently added '192.168.122.122' (ED25519) to the list of known hosts.
__| __|_ )
_| ( / Amazon Linux 2 AMI
___|\___|___|
https://aws.amazon.com/amazon-linux-2/
8 package(s) needed for security, out of 17 available
Run "sudo yum update" to apply all updates.
[xe@mayhem ~]$
```
And voila! A new virtual machine that you can do whatever you want with, just
like you would any other server.
[Do you really need to make an ISO file for this? Can't I just use HTTP like <a
href="https://docs.aws.amazon.com/AWSEC2/latest/UserGuide/ec2-instance-metadata.html">the
AWS metadata service</a>?](conversation://Mara/hmm)
Yes and no. You can have the configuration loaded over HTTP/S, but without
special network configuration you won't be able to have `http://169.254.169.254`
work like the AWS metadata service without a fair bit of effort. Either way, you
are going to have to edit the virtual machine's XML though.
[XML? Why is XML involved?](conversation://Mara/wat)
virt-manager is a frontend to [libvirt](https://libvirt.org/index.html). libvirt
uses XML to describe virtual machines.
[Here](https://gist.github.com/Xe/f870ebb2d9dce0929a35a4ba347cbda3) is the XML
used to describe the VM you made earlier. This looks like a lot (because frankly
it is a lot, computers are complicated), however this is a lot more manageable
than the equivalent qemu flags.
[What do the qemu flags look like?](conversation://Mara/hmm)
[Like
this](https://gist.githubusercontent.com/Xe/2eba35ec6cbd54becf9fca02f6d69f0b/raw/89d68424c0ae26333d798bd9bd6a224dfec844d7/qemu%2520flags.txt).
It is kind of a mess that I would rather have something made by people smarter
than me take care of.
To enable cloud-init to load over HTTP, you are going to have to add the qemu XML
namespace to mayhem's configuration. At the top you should see a line that looks
like this:
```xml
<domain type="kvm">
```
Replace it with one that looks like this:
```xml
<domain xmlns:qemu="http://libvirt.org/schemas/domain/qemu/1.0" type="kvm">
```
This will allow you to set the cloud-init seed location information using a
[SMBIOS value](https://en.wikipedia.org/wiki/System_Management_BIOS). To enable
this, add the following to the _bottom_ of your XML file, just before the
closing `</domain>`:
```xml
<qemu:commandline>
<qemu:arg value="-smbios"/>
<qemu:arg value="type=1,serial=ds=nocloud-net;h=mayhem;s=http://10.77.2.22:8000/mayhem/"/>
</qemu:commandline>
```
Make sure the data is actually being served on that address. Here's a nix-shell
python one-liner HTTP server:
```console
$ nix-shell -p python3 --run 'python -m http.server 8000'
```
Then you will need to either load the base image back into the zvol or recreate
the qcow2 file to reset the VM back to its default state.
Reboot the VM and wait for it to connect to your "metadata server":
```console
192.168.122.122 - - [04/Jun/2021 11:41:10] "GET /mayhem/meta-data HTTP/1.1" 200 -
192.168.122.122 - - [04/Jun/2021 11:41:10] "GET /mayhem/user-data HTTP/1.1" 200 -
```
Then you can SSH into it like normal:
```console
$ ssh xe@192.168.122.122
The authenticity of host '192.168.122.122 (192.168.122.122)' can't be established.
ED25519 key fingerprint is SHA256:eJRjDsvnVrXfntVtNVN6N+JdakaA+dvGKWWQP5OFkeA.
This key is not known by any other names
Are you sure you want to continue connecting (yes/no/[fingerprint])? yes
Warning: Permanently added '192.168.122.122' (ED25519) to the list of known hosts.
__| __|_ )
_| ( / Amazon Linux 2 AMI
___|\___|___|
https://aws.amazon.com/amazon-linux-2/
8 package(s) needed for security, out of 17 available
Run "sudo yum update" to apply all updates.
[xe@mayhem ~]$
```
[Can I choose other distros for this?](conversation://Mara/hmm)
Yep! Most distributions offer cloud-init enabled images. They may be hard to
find, but they do exist. Here's some links that will help you with common
distros:
- [Arch Linux](https://mirror.pkgbuild.com/images/) (use the `cloudimg` ones)
- [CentOS 7](https://cloud.centos.org/centos/7/images/) (use the `GenericCloud`
one)
- [CentOS 8](https://cloud.centos.org/centos/8-stream/x86_64/images/) (use the
`GenericCloud` one)
- [Debian 9](http://cloud.debian.org/images/cloud/OpenStack/9.13.22-20210531/)
(use the `openstack` one)
- [Debian 10](http://cloud.debian.org/images/cloud/buster/20210329-591/) (use
the `generic` one)
- [Debian 11](http://cloud.debian.org/images/cloud/bullseye/daily/) (use the
`generic` one)
- [Fedora 34](https://alt.fedoraproject.org/cloud/) (use the Openstack image)
- [OpenSUSE Leap
15.2](https://download.opensuse.org/repositories/Cloud:/Images:/Leap_15.2/images/)
(use the `OpenStack` image)
- [OpenSUSE Leap 15.3](https://get.opensuse.org/leap/) (use the JeOS one labeled
`OpenStack-Cloud`)
- [OpenSUSE Tumbleweed](https://download.opensuse.org/tumbleweed/appliances/)
(use the JeOS one labeled `Openstack-Cloud`)
- [Ubuntu](https://cloud-images.ubuntu.com/) (use the `server-cloudimg` image
for your version of choice)
In general, look for images that are compatible with OpenStack. OpenStack uses
cloud-init to configure virtual machines and the NoCloud data source you're using
ships by default. It usually works out, except for cases like OpenSUSE Leap
15.1. With Leap 15.1 you have to [pretend to be OpenStack a bit
more](https://github.com/tailscale/tailscale/blob/aa6abc98f30df67a0d86698b77932d4d9cc45ac0/tstest/integration/vms/opensuse_leap_15_1_test.go)
for some reason.
[What if I need to template the userdata file?](conversation://Mara/hmm)
[You really should avoid doing this if possible. Templating yaml is a delicate
process fraught with danger. The error conditions in things like Kubernetes are
that it does the wrong thing and you need to replace the service. The error
condition with this is that you lose access to your
server.](conversation://Cadey/facepalm)
[Let's say that Facts and Circumstances™ made me have to template
it.](conversation://Mara/happy)
<center>
<picture>
<source srcset="https://cdn.christine.website/file/christine-static/stickers/cadey/percussive-maintenance.avif" type="image/avif">
<source srcset="https://cdn.christine.website/file/christine-static/stickers/cadey/percussive-maintenance.webp" type="image/webp">
<img src="https://cdn.christine.website/file/christine-static/stickers/cadey/percussive-maintenance.png" alt="Cadey is percussive-maintenance">
</picture>
</center>
When you are templating yaml, you have to be really careful. It is very easy to
incur [the wrath of Norway and
Ontario](https://hitchdev.com/strictyaml/why/implicit-typing-removed/) on
accident with yaml. Here are some rules of thumb (unfortunately gained from
experience) to keep in mind:
- yaml has implicit typing, quote everything to be safe.
- ensure that every value you pass in is yaml-safe
- ensure that the indentation matches for every value
Something very important is to test the templating on a virtual machine image
that you have a back door into. Otherwise you will be locked out. You can
generally hack around it by adding `init=/bin/sh` in your kernel command line
and changing your password from there.
When you mess it up you will need to get into the VM somehow and do one of a few
things:
1. Run `cloud-init collect-logs` to generate a log tarball that you can export
to your host machine and dig into from there
2. Look through the system journal for any errors
3. Look in `/var/log` for files that begin with `cloud-init` and page through
them
If all else fails, start googling. If you are running commands against a VM with
the `runcmd` feature of cloud-init, I'd suggest going through the steps on a
manually installed virtual machine image at least once so you can be sure the
steps work. I have lost 4 hours of time to this. Also keep in mind that in the
context that `runcmd` runs from, there is no standard input hooked up. You will
need to pass `-y` everywhere.
If you want a simple Alpine Linux image to test with, look
[here](https://github.com/Xe/alpine-image) for the Alpine Linux images I test
with. You can download this image from
[here](https://xena.greedo.xeserv.us/pkg/alpine/img/alpine-edge-2021-05-18-cloud-init-within.qcow2)
in case you trust that I wouldn't put malware in that image and don't want to
make your own.
---
In the future I plan to use cloud-init _extensively_ within my [new homelab
cluster](https://twitter.com/theprincessxena/status/1400592778309115905). I have
plans to make a custom VM management service I'm calling
[waifud](https://github.com/Xe/waifud). I will write more on that as I have
written the software. I currently have a minimum viable prototype of this tool
called `mkvm` that I'm using today without any issues. I also will be writing up
how I built the cluster and installed NixOS on all the systems in a future
article.
cloud-init is an incredible achievement. It has its warts, but it being used in
so many places enables you to make configuring virtual machines so much easier.
It [even works on Windows!](https://cloudbase.it/cloudbase-init/). As much as I
complain about it in this post, life would be so much worse without it. It
allows me to use the magic of the cloud in my local virtual machines so I can
get better use out of my hardware.
|
